Publicado el 20th Agosto, 2017 por KaRMaN. Archivado en Hardware, Linux.
Leido 275,121 veces. 6 comentarios archivados.
I just got recently installed my first FTTH router (pepephone, but same model is used in masmovil and jazztel) and as any network engineer I wanted to have full access to the router. Looking over the vast internet I found a blogpost that used a USB with a symlink to smb.conf so it can be edited to add exec parameters to execute an downloaded busybox to open an alternative telnetd but the article had a big problem that make it imposible to work on my router: the F680 of the article has an ARM architecture. My router has MIPS instead. This is important to know beforehand if using external-downloaded busybox binaries. In the end I skipped the busybox hack to directly allow admin telnet connection instead the buggy limited one. This is how I did it, I will assume that router has IP address 192.168.1.1.
Leer el resto de la entrada »
Publicado el 25th Enero, 2016 por KaRMaN. Archivado en Electrónica, Hardware, Tips.
Leido 72,378 veces. 1 comentario archivado.
I had lying around an expired RSA SecurID with the typical blank display only showing a small 3 in the right.
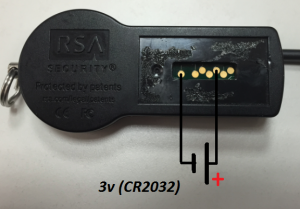
Looking for some info about expired tokens I found an old topic at flickr (original URL here) where Travis Goodspeed managed to revive one the tokens with a simple trick: apply 3v for a second in two of the pads behind the protective plate.
Here is the diagram:

Expired RSA SecurID Token Revival Diagram
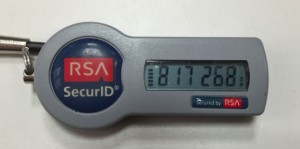
Here the revived Token:

Expired RSA SecurID Token Revived
The token was expired since november 2011 but still got battery to keep working.
I Haven’t tested if token still is valid to autenticate against RSA daemon after revival.
Publicado el 29th Diciembre, 2015 por KaRMaN. Archivado en Sin categoria.
Leido 5,149 veces. 1 comentario archivado.
Just an old seat airbag that was found on the garbage. Recorded a 240fps.
Publicado el 19th Agosto, 2014 por KaRMaN. Archivado en Arduino, VMware.
Leido 17,765 veces. Comments Off
So, I wanted to test the Mooltipass in different platforms besides my main OS, Mac OS X. The better way is to use virtual machines I already have VMware Fusion. On first try I wasn’t able to associate the Mooltipass to any of my virtual machines because the MP is an HiD device and as so, is always connected to the main OS and then emulated via VMware Fusion in the guest OS (in my case, Windows XP and Windows 8):

Mooltipass is not eligible to be associated to the guest OS
After some googling I found a relevant KB (knowledge base) article about associating HiD devices entirely to a Virtual Machine and disassociating it from the host OS: http://kb.vmware.com/selfservice/microsites/search.do?language=en_US&cmd=displayKC&externalId=1033435.
The article says that the virtual machine hardware definition file (.vmx extension, usually located at /Users/$USER/Documents/Virtual Machines.localized) has to be manually edited after shutting down the virtual machine and the VMware Fusion to add the two following lines:
usb.generic.allowHID = "TRUE"
usb.generic.allowLastHID = "TRUE"
After adding both lines, you can safely search for the Mooltipass HiD devide to properly associate it to the guest OS:

vmware_fusion_screenshot_with_usb_mooltipass
Update: Since VMware Fusion 7.1.1 it’s necessary to also add usb.generic.allowHID = “TRUE” in the following file: /Users/$USER/Library/Preferences/VMware\ Fusion/preferences
Publicado el 8th Julio, 2013 por KaRMaN. Archivado en Cacharros, Electrónica.
Leido 455,636 veces. Comments Off
This is a donation of a friend as its not working. Actually this kindle 3 stop working when booting, hence the reason that shows the booting load bar.

broken Kindle 3 Front
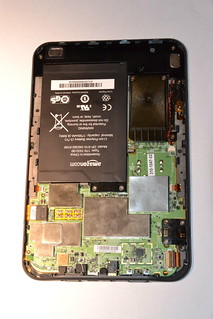
I tried to search for onboard blown fuses but every single fuse I found was in good condition. After that I researched over internet and found that has a debug serial port. I tried to attach my usb to serial ttl converter with a little level shifter (kindle serial port works in 1.8v) but had no luck, not even a single character was shown in my Zterm :(

broken Kindle 3 Back Opened
I wanted to install debian to see how the display could work and some few hack I’m thinking of but being the board pretty much dead (only seems to work for its battery charging) I decided to save it for parts as battery, case, metal frame, keyboard and display seems in good working conditions (although I’ve not been able to test them properly). If some generous reader has a kindle 3 with a broken display and he/she is willing to donate it to science I’ll be more than happy to pay the shipping.


